Quiz application
In this tutorial, we will build a quiz application using React and integrate it with the EYWA platform via GraphQL (GQL). The quiz application will allow users to log in, fetch quiz data from the EYWA backend, and interact with the quiz in real-time. We'll cover setting up authentication, connecting to the GraphQL endpoint, and handling user interactions within the quiz.
Dataset#
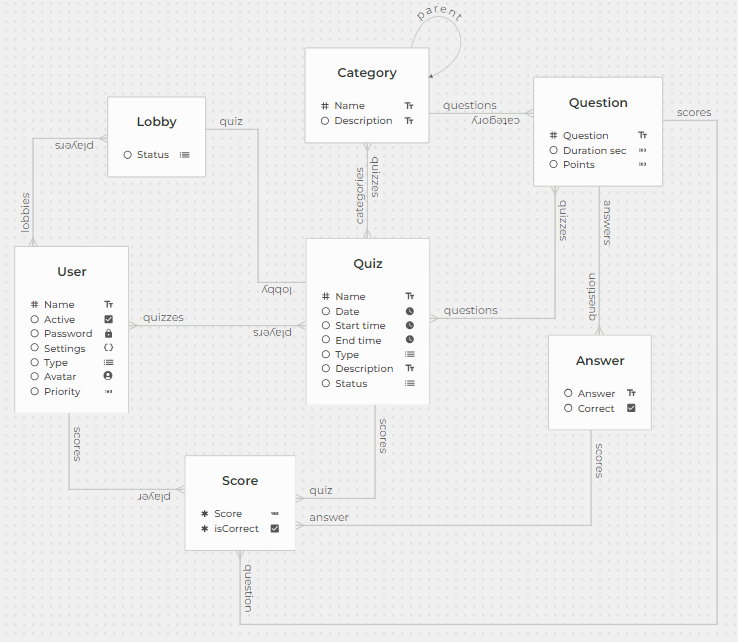
This quiz dataset schema provides a comprehensive structure for managing quizzes, users, questions, and scores. It enables a detailed and flexible way to organize and relate different components of the quiz application, ensuring that all necessary data is connected and accessible for creating a dynamic and interactive quiz experience.
Homepage#
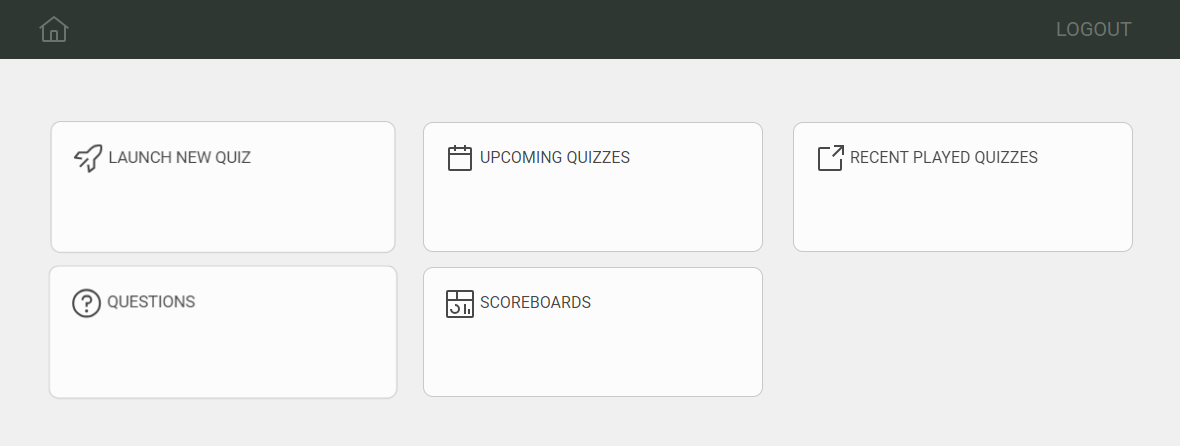
The homepage of the quiz application provides quick access to various features and sections. It includes options to launch a new quiz, view upcoming quizzes, review recently played quizzes, manage questions, and check scoreboards.
The homepage features the following sections:
- Launch New Quiz: Start a new quiz session.
- Upcoming Quizzes: View quizzes that are scheduled to take place soon.
- Recent Played Quizzes: Review quizzes that you have recently participated in.
- Questions: Manage and review quiz questions.
- Scoreboards: Check the scores and rankings of quizzes.
This layout ensures that users can easily navigate through the various functionalities of the quiz application, providing a seamless and interactive user experience.
Launch new quiz#
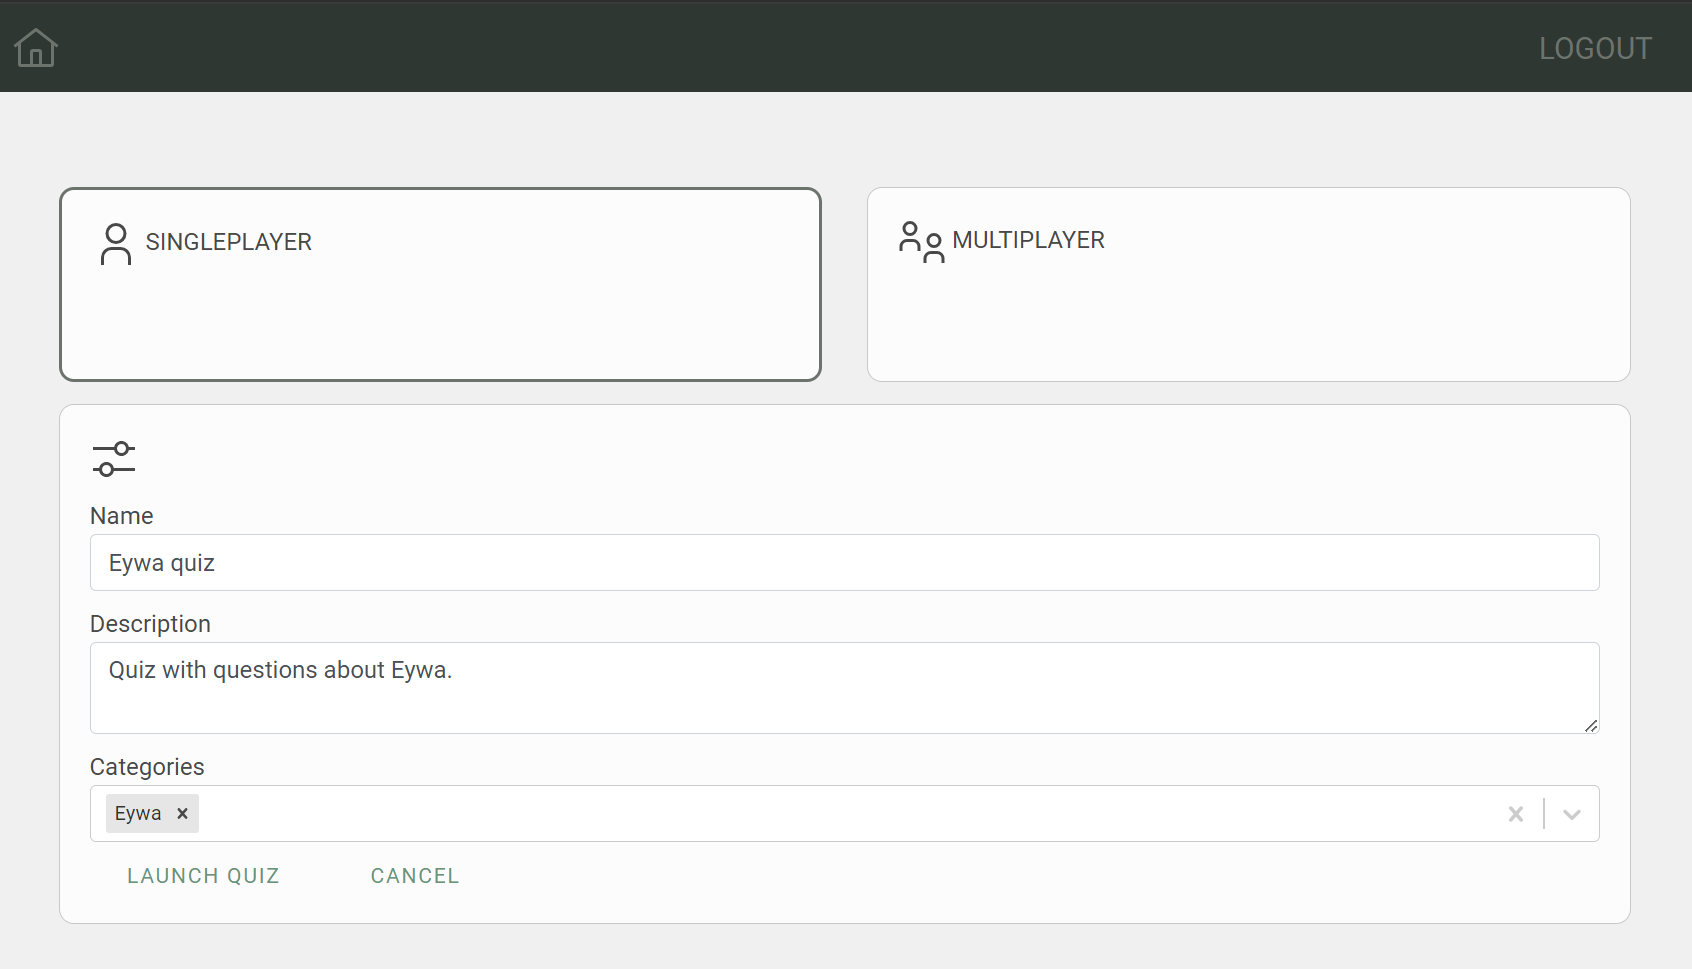
The "Launch New Quiz" section provides a user-friendly interface for setting up a new quiz session. Users can choose between singleplayer and multiplayer modes, enter quiz details, select categories, invite other players, and schedule the start time. This comprehensive setup ensures that users can easily create and configure quizzes to meet their specific needs.
SINGLEPLAYER:
MULTIPLAYER:
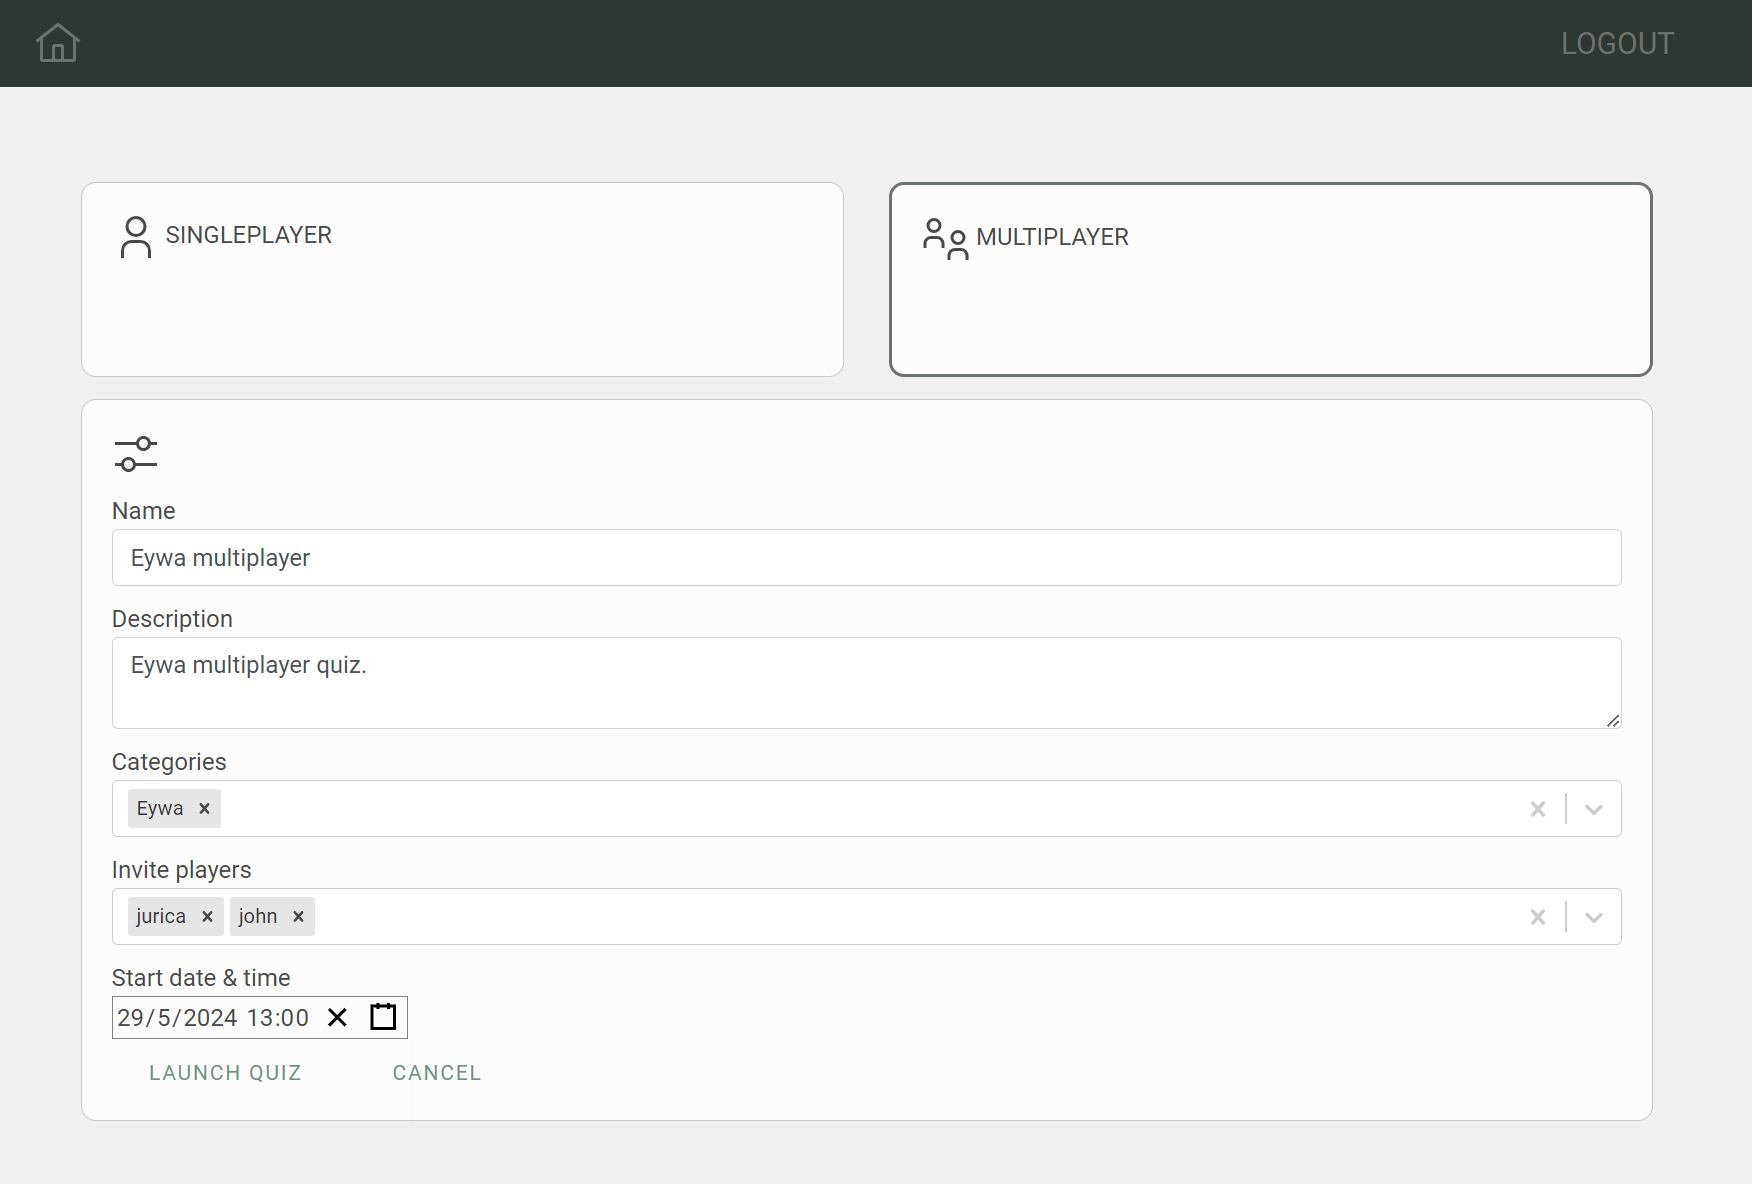
In this section, we will demonstrate how to interact with the EYWA GraphQL endpoint by launching a new quiz. This use case will show how to use GraphQL mutations to sync the quiz details with the backend and handle the user interaction when the "LAUNCH QUIZ" button is clicked.
Launch Quiz Button#
Here is the code snippet for the "Launch Quiz" button:
<Button buttonState={ButtonState.PRIMARY_TRANSPARENT} onClick={handleLaunch} label={"LAUNCH QUIZ"} />Function to Sync Quiz#
The syncQuiz GraphQL mutation (sync mutations) is defined as follows. It takes a quiz input and returns the unique identifier (euuid) of the synced quiz.
export const SYNC_QUIZ = `mutation syncQuiz($quiz: QuizInput!) { syncQuiz(quiz: $quiz) { euuid }}`;The syncQuiz function sends a GraphQL mutation to the EYWA platform to create or update the quiz with the provided details.
const syncQuiz = async () => {  try {    const response = await client.request<SyncQuizResponse>(SYNC_QUIZ, {      quiz: {        type: selectedQuizType,        status: selectedQuizType === "MULTIPLAYER" ? "SCHEDULED" : "STARTED",        name: newQuiz.name,        date: selectedQuizType === "MULTIPLAYER" ? newQuiz.start_time : new Date().toISOString(),        description: newQuiz.description,        categories: newQuiz.categories.map((category) => {          return { euuid: category.value };        }),        players:          selectedQuizType === "MULTIPLAYER"            ? newQuiz.players.map((player) => {                return { euuid: player.value };              })            : [{ euuid: userData.euuid }],        start_time: selectedQuizType === "MULTIPLAYER" ? newQuiz.start_time : new Date().toISOString(),        questions: categories          .filter((category) =>            newQuiz.categories.some((selectedCategory) => selectedCategory.value === category.euuid)          )          .flatMap((category) =>            category?.questions?.map((question) => {              return { euuid: question.euuid };            })          ),      },    });
return response; } catch (error) { throw new Error("Could not sync quiz"); }};Handling Launch#
The handleLaunch function handles the user interaction when the "LAUNCH QUIZ" button is clicked. It calls syncQuiz to synchronize the quiz details, navigates to the appropriate page based on the quiz type, refetches quizzes, and resets the form.
const handleLaunch = async () => { try { // Launch/Schedule new quiz const response = await syncQuiz(); // Redirect depending on quiz type selectedQuizType === "SINGLEPLAYER" ? navigate(`${import.meta.env.BASE_URL}quiz/${response.syncQuiz.euuid}`) : navigate(`${import.meta.env.BASE_URL}home`); // Refetch quizzes await getQuizzes(); // Reset form resetFormToInitialState(); } catch (error) { throw new Error("Could not launch quiz:" + error); }};Quiz flow#
Multiplayer#
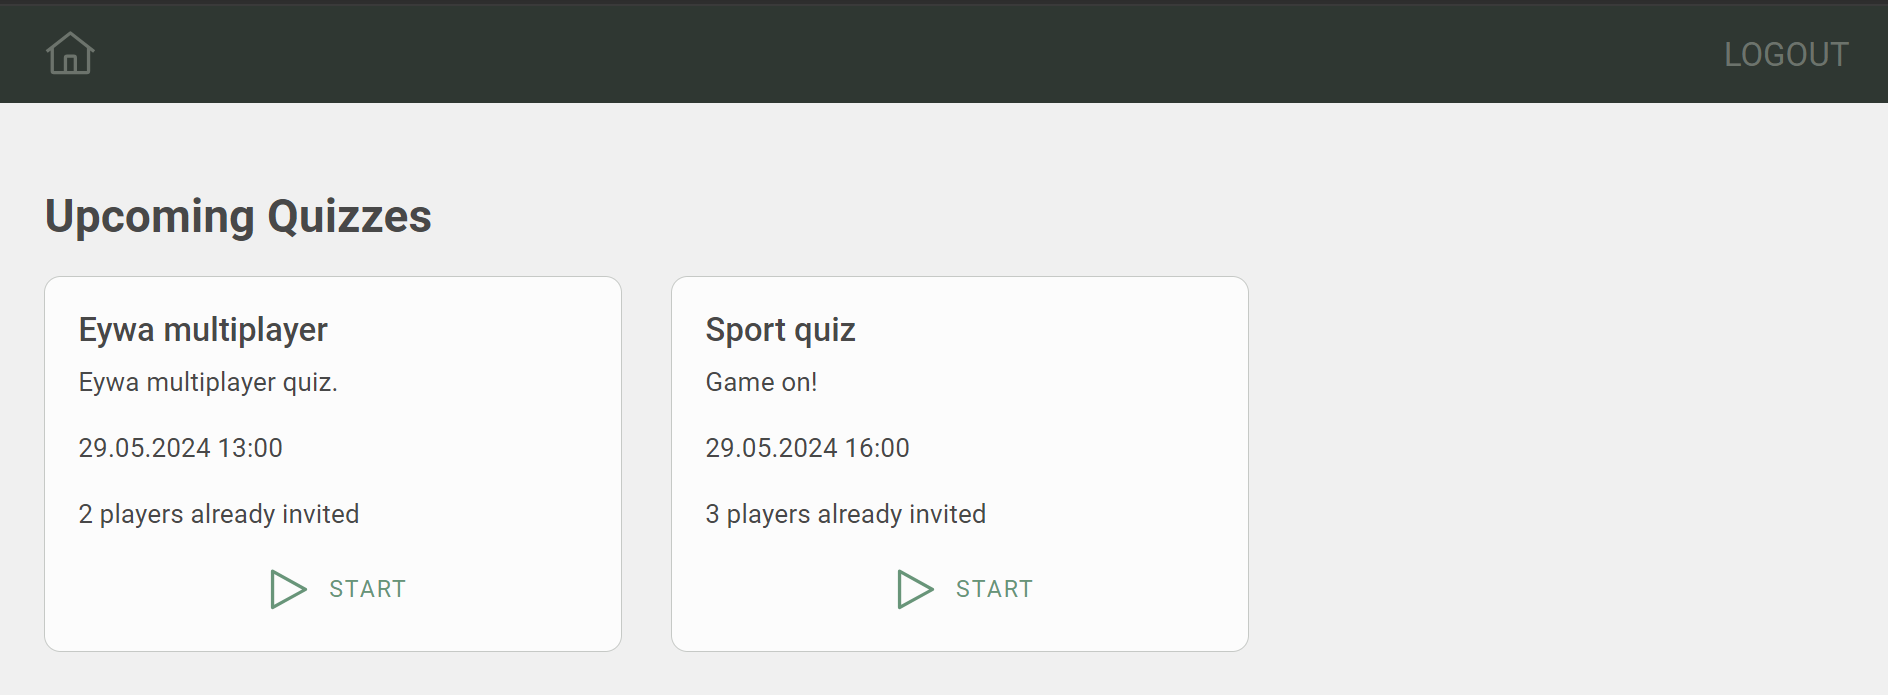
After scheduling the MULTIPLAYER quiz, you'll be redirected to the home page. There, you'll find a section called "UPCOMING QUIZZES," where you can see all the quizzes that are scheduled to take place soon. The multiplayer quiz you scheduled will be listed in this section.
Upcoming quizzes(upcomingQuizzes.tsx)#
Fetch upcoming quizzes#
GrapgQL searchQuiz query (search query) to get all upcoming quizzes that are either in the SCHEDULED or LOBBY status. Order the fetched quizzes by start_time in ascending order.
export const SEARCH_UPCOMING_QUIZZES = `{ searchQuiz( # Fetch quizzes that are either in the SCHEDULED or LOBBY status _where: {_or: [{status: {_eq: SCHEDULED}}, {status: {_eq: LOBBY}}]} # Order the fetched quizzes by start_time in ascending order _order_by: {start_time: asc} ) { date end_time euuid modified_on name description start_time type status questions { duration_sec euuid modified_on points question answers { euuid answer correct } } players { avatar euuid name type } lobby { euuid status players { avatar euuid name type } } }}`;Fetch upcoming quizzes and set the state:
export interface QuizQueryResponse {  searchQuiz: Quiz[];}
const [upcomingQuizzes, setUpcomingQuizzes] = useState<Quiz[]>([]);const navigate = useNavigate();const { userData } = useUser();
useEffect(() => {  const fetchUpcomingQuizzes = async () => {    try {      const { searchQuiz } = await client.request<QuizQueryResponse>(SEARCH_UPCOMING_QUIZZES);      setUpcomingQuizzes(searchQuiz);    } catch (error) {      console.error("Error fetching upcoming quizzes:", error);    }  };
fetchUpcomingQuizzes();}, []);Render fetched quizzes#
Render the fetched upcoming quizzes in the "UPCOMING QUIZZES" section:
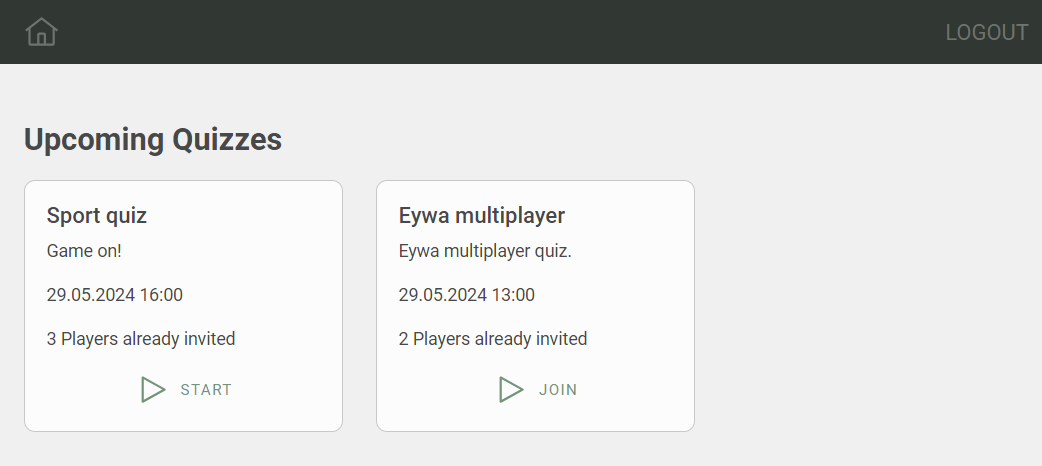
return ( <Layout> <div className="Header--title">Upcoming Quizzes</div> <Row> {upcomingQuizzes.map((quiz) => ( <Col md={4} key={quiz.euuid} className="quiz-card"> <Card className="Card"> <CardBody> <h5>{quiz.name}</h5> <p>{quiz.description}</p> <p>{moment(quiz.start_time).format("DD.MM.YYYY HH:mm")}</p> {quiz?.players?.length > 0 && ( <p>{`${quiz.players.length} ${quiz.players.length > 1 ? "Players " : "Player"} already invited`}</p> )} <Col className="d-flex justify-content-center"> {!quiz?.lobby && ( <Button buttonState={ButtonState.PRIMARY_TRANSPARENT} label="START" onClick={() => { handleStartMultiplayer(quiz); }} > <span className="Btn__icon"> <Play size={32} /> </span> </Button> )} {quiz?.lobby?.status === "WAITING" && ( <Button buttonState={ButtonState.PRIMARY_TRANSPARENT} label="JOIN" onClick={() => handleJoinLobby(quiz)} > <span className="Btn__icon"> <Play size={32} /> </span> </Button> )} </Col> </CardBody> </Card> </Col> ))} </Row> </Layout>);Start Multiplayer Quiz#
When the "START" button is clicked, the handleStartMultiplayer function is called to start the lobby for the multiplayer quiz, syncQuiz mutation is called to update the quiz status to "LOBBY," and the lobby status to "WAITING." The quiz is then refetched to update the state.
const handleStartMultiplayer = async (quiz: Quiz) => { try { const response = await client.request(SYNC_QUIZ, { quiz: { euuid: quiz.euuid, status: "LOBBY", lobby: { status: "WAITING", }, }, }); await getQuizzes(); } catch (err) { throw new Error(String(err)); }};Join Multiplayer Quiz#
When the "JOIN" button is clicked, the handleJoinQuiz function is triggered to add the player to the multiplayer lobby. This allows the quiz to be started once all players have joined. To achieve this, the stackLobby mutation (stack mutation) is executed, which adds the player to the lobby while retaining the players who have already joined.
const handleJoinLobby = async (quiz: Quiz) => { try { const response = await client.request(STACK_LOBBY, { lobby: { euuid: quiz.lobby.euuid, players: [ { euuid: userData.euuid, }, ], }, }); await getQuizzes(); // Navigate to lobby navigate(`${import.meta.env.BASE_URL}quiz/${quiz.euuid}/lobby`); } catch (err) { throw new Error(String(err)); }};Lobby#
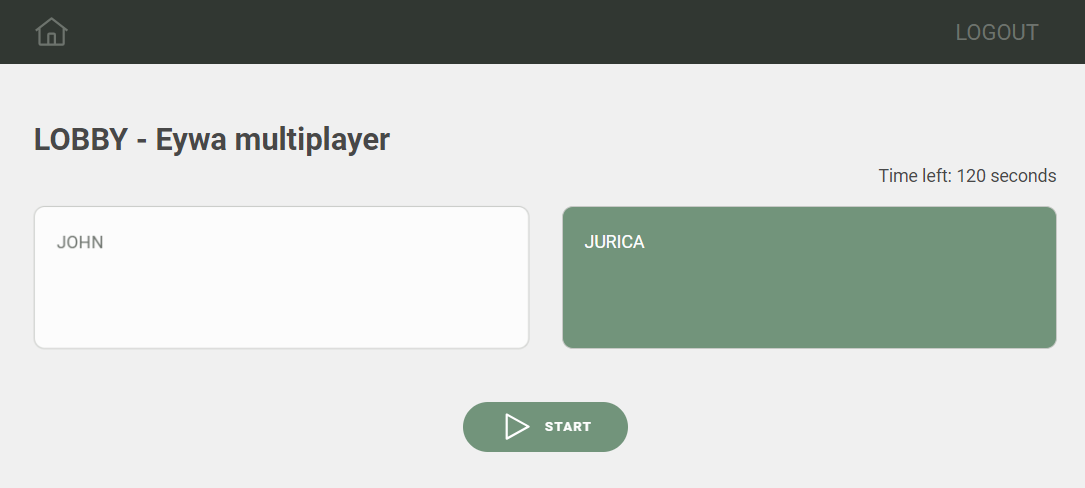
The lobby is where players can join the multiplayer quiz and wait for the quiz to start. The lobby displays the list of players who have joined the quiz and who are invited to join. Once all players have joined, the quiz can be started.
Render invited and joined players#
Render the invited and joined players in the lobby:
<Row>  {quiz?.players?.map(    (player) =>      !isPlayerInLobby(player) && (        <Col md={6} key={player.euuid} className="quiz-card">          <Card className={`Card Card__waiting`}>            <CardBody>              <CardText>{player.name?.toUpperCase()}</CardText>            </CardBody>          </Card>        </Col>      )  )}
{quiz?.lobby?.players?.map((player) => ( <Col md={6} key={player.euuid} className="quiz-card"> <Card className={`Card Card__joined`}> <CardBody> <CardText>{player.name?.toUpperCase()}</CardText> </CardBody> </Card> </Col> ))}</Row>Start your quiz#
When all players have joined the lobby or when admin decides to start the quiz, the "START QUIZ" button is displayed. When the button is clicked, the handleStartQuiz function is called to start the quiz.
const handleStartQuiz = async () => { try { const response = await client.request(SYNC_QUIZ, { quiz: { euuid: quiz?.euuid, status: "STARTED", lobby: { euuid: quiz?.lobby?.euuid, status: "STARTED", }, players: quiz?.lobby?.players ? quiz?.lobby?.players.map((player) => { return { euuid: player.euuid, }; }) : undefined, }, }); await getQuizzes(); navigate(`${import.meta.env.BASE_URL}quiz/${quiz?.euuid}`); } catch (err) { throw new Error(String(err)); }};In handleStartQuiz syncQuiz mutation is called to update the quiz status to "STARTED" and the lobby status to "STARTED". Players who have joined the lobby are added to the quiz. The quiz is then started, and the user is redirected to the quiz page.
<Button buttonState={ButtonState.PRIMARY} label="START" onClick={handleStartQuiz}> <span className="Btn__icon"> <Play size={32} /> </span></Button>After starting the quiz, the user is redirected to the quiz page, where they can select answers as they progress through the questions. See answering questions.
Singleplayer#
Once you've started the SINGLEPLAYER quiz, it begins immediately. You'll be able to select your answers as you progress through the questions. At the end of the quiz, you'll receive your results right away. See answering questions.
Answering questions#
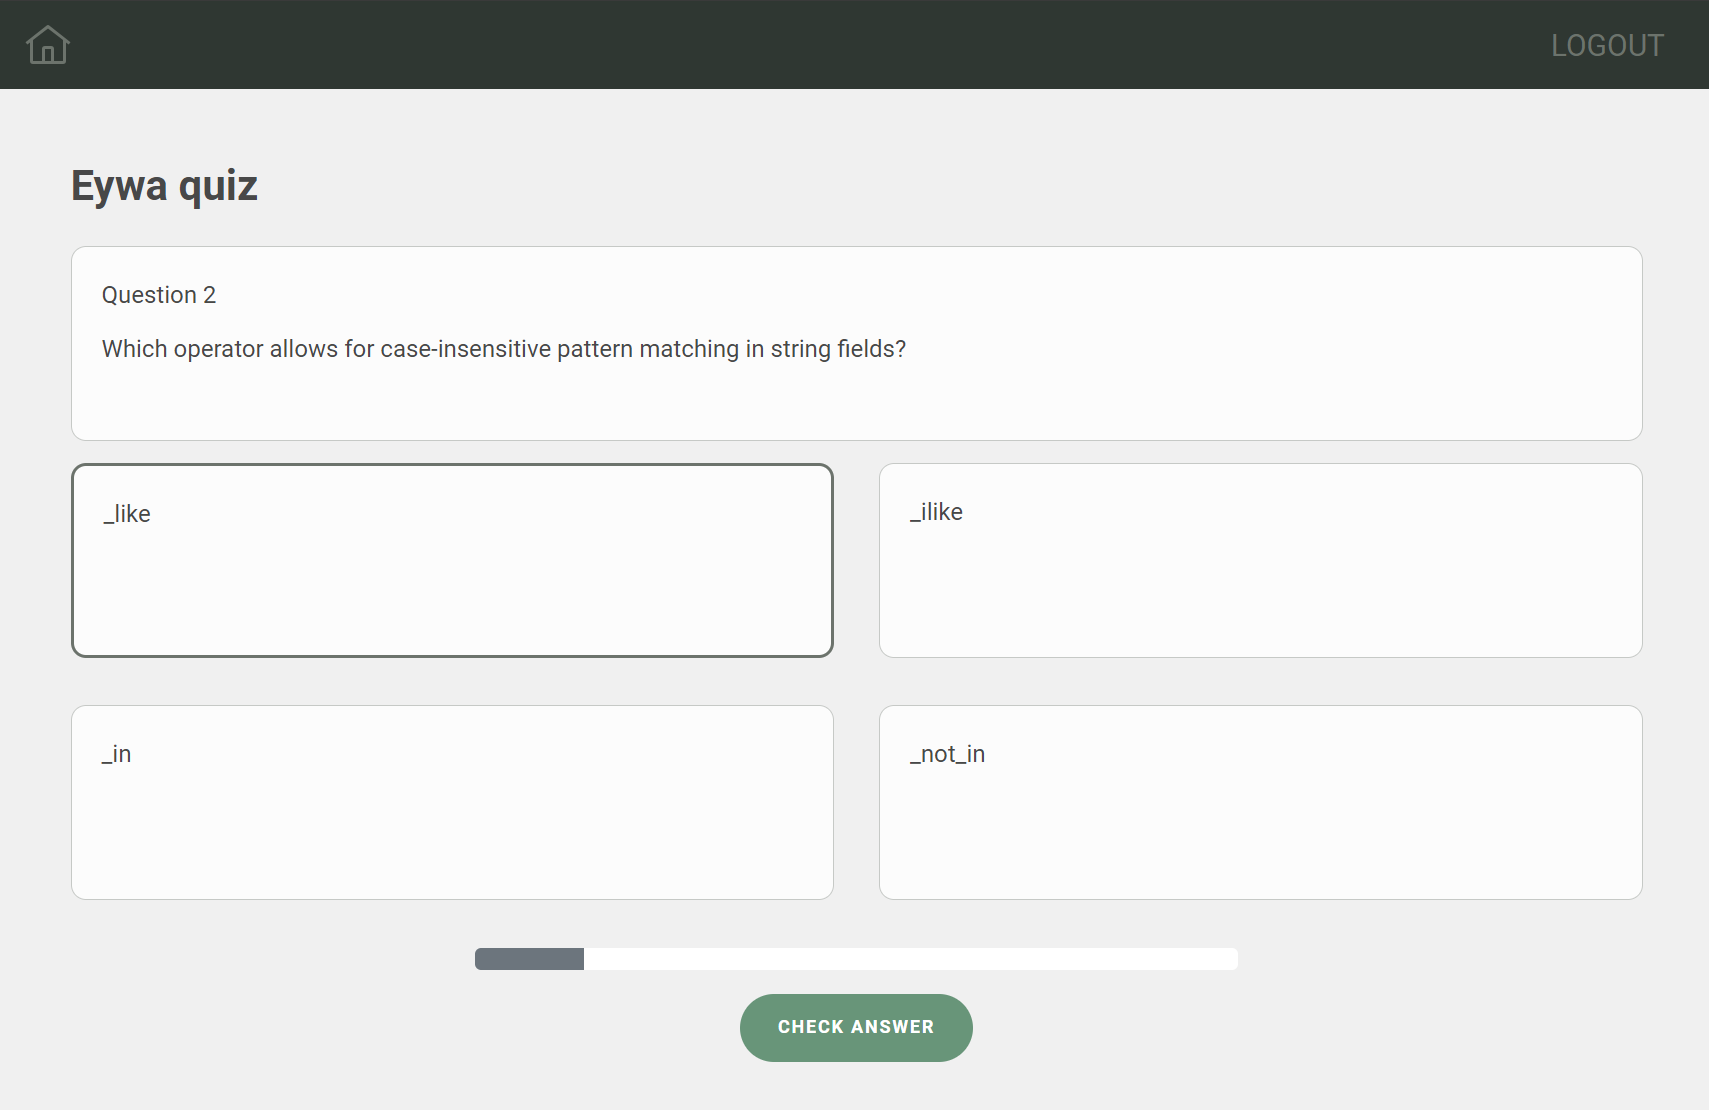
When a question is displayed, you need to select an answer and then click on "CHECK ANSWER" to see if your choice is correct.
Render question and answers#
<Row> <Col> <Card className="Card Card__static"> <CardBody> <CardTitle>{`Question ${currentQuestionIndex + 1}`}</CardTitle> <CardText>{quiz?.questions[currentQuestionIndex]?.question}</CardText> </CardBody> </Card> </Col></Row><Row className="mb-3"> {quiz?.questions[currentQuestionIndex]?.answers?.map((answer, index) => ( <Col key={index} md={6} onClick={() => handleAnswerClick(index)} className="mb-3"> <Card className={`Card ${selectedAnswers[currentQuestionIndex] === index ? "Card__selected" : ""} ${ showAnswerResult && selectedAnswers[currentQuestionIndex] === index && !isCorrect ? "Card__incorrect" : "" } ${showAnswerResult && correctAnswerIndex === index ? "Card__correct" : ""}`} > <CardBody> <CardText>{answer.answer}</CardText> </CardBody> </Card> </Col> ))}</Row>Handle answer click#
When an answer is clicked, the handleAnswerClick function is called to select the answer. The selected answer is stored in the selectedAnswers array, and the state is saved to local storage to preserve the state on page refresh.
const handleAnswerClick = (index) => { // Disable the answer click if the question is already checked or the answer result is showing if (checkedQuestions[currentQuestionIndex] || showAnswerResult) return; const updatedAnswers = [...selectedAnswers]; if (updatedAnswers[currentQuestionIndex] === index) { updatedAnswers[currentQuestionIndex] = null; } else { updatedAnswers[currentQuestionIndex] = index; } // Set the selected answers and for rest of the questions set null setSelectedAnswers([...updatedAnswers, ...new Array(quiz?.questions.length! - updatedAnswers.length).fill(null)]); // Save the state to local storage to preserve the state on page refresh saveStateToLocalStorage({ currentQuestionIndex, selectedAnswers: updatedAnswers, checkedQuestions, });};Check answer#
When the "CHECK ANSWER" button is clicked, the handleCheckAnswer function is called to check the selected answer. The selected answer is compared with the correct answer, and the result is displayed.
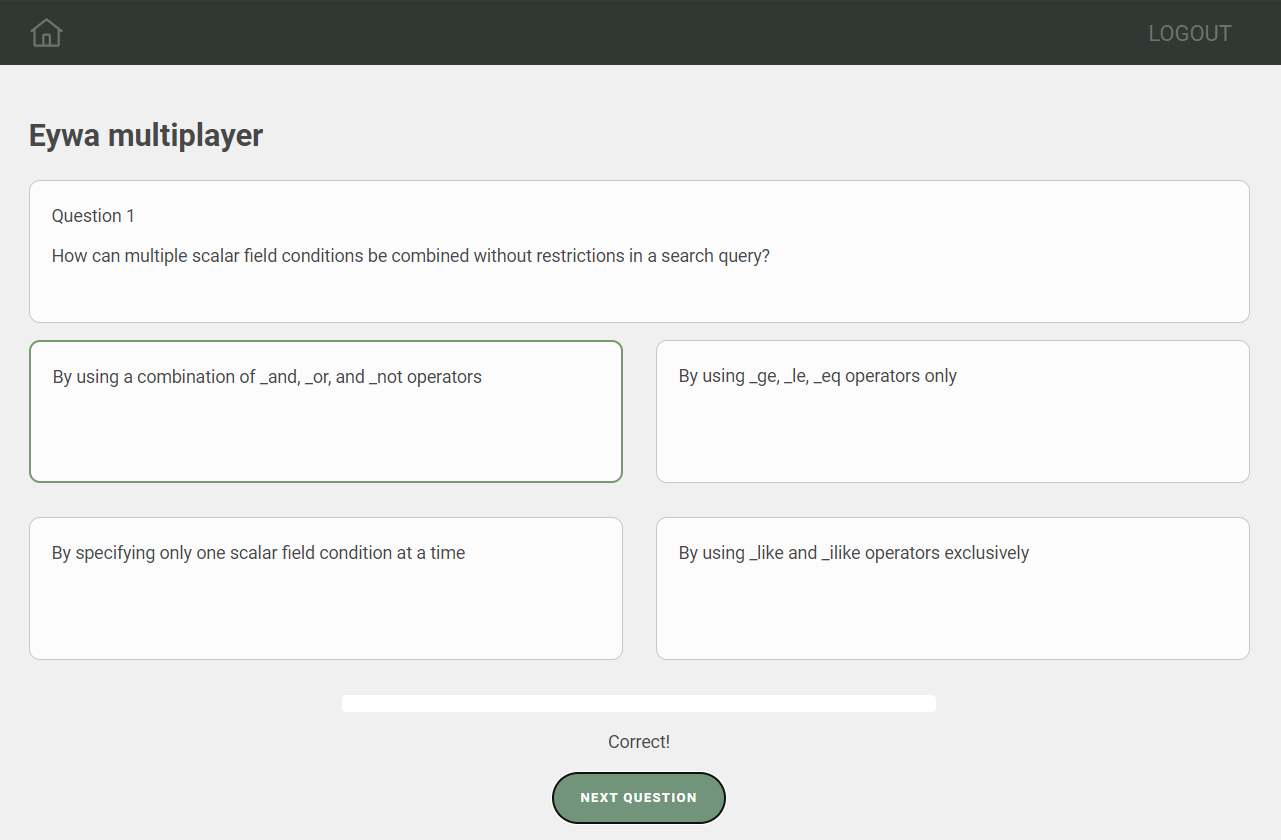
The handleCheckAnswer function verifies if a selected answer is not null and then retrieves the current question from the quiz object. It checks the correctness of the selected answer, updates the isCorrect, correctAnswerIndex, and showAnswerResult state variables accordingly, and marks the current question as checked by updating the checkedQuestions array. It ensures the state is updated without directly mutating the original array and saves the updated state to local storage. This function ensures that the quiz application correctly processes the selected answer and maintains the quiz state across sessions.
const handleCheckAnswer = () => { if (selectedAnswers[currentQuestionIndex] !== null) { const currentQuestion = quiz?.questions[currentQuestionIndex]!; const correct = currentQuestion.answers[selectedAnswers[currentQuestionIndex]]?.correct; const correctIndex = currentQuestion.answers.findIndex((answer) => answer.correct); setIsCorrect(correct); setCorrectAnswerIndex(correctIndex); setShowAnswerResult(true); const updatedCheckedQuestions = [...checkedQuestions]; updatedCheckedQuestions[currentQuestionIndex] = true; setCheckedQuestions(updatedCheckedQuestions); saveStateToLocalStorage({ currentQuestionIndex: currentQuestionIndex + 1, selectedAnswers, checkedQuestions: updatedCheckedQuestions, }); }};<Button buttonState={ButtonState.PRIMARY} label={"CHECK ANSWER"} onClick={handleCheckAnswer} disabled={selectedAnswers[currentQuestionIndex] === null}/>Next question#
After checking the answer, you can proceed to the next question by clicking on the "NEXT QUESTION" button. The handleNextQuestion function is called to navigate to the next question.
const handleNextQuestion = () => { if (currentQuestionIndex < (quiz?.questions.length ?? 0) - 1) { setCurrentQuestionIndex(currentQuestionIndex + 1); } else { handleFinishQuiz(); } setShowAnswerResult(false); setIsCorrect(null); setCorrectAnswerIndex(null);};<Button buttonState={ButtonState.PRIMARY} label={currentQuestionIndex < (quiz?.questions.length ?? 0) - 1 ? "NEXT QUESTION" : "FINISH"} onClick={handleNextQuestion}/>Finish quiz#
After answering all the questions, you can finish the quiz by clicking on the "FINISH" button. Inside the handleNextQuestion function, the handleFinishQuiz function is called to finish the quiz if the current question index is equal to the total number of questions.
const handleFinishQuiz = async () => { setLoading(true); let queryVariableList = { scores: [] as ScoreQueryVariable[], }; quiz?.questions.forEach((question, index) => { queryVariableList.scores.push({ player: { euuid: userData?.euuid, }, quiz: { euuid: quiz?.euuid, }, question: { euuid: question.euuid, }, score: question.answers[selectedAnswers[index]]?.correct ? question.points : 0, iscorrect: question.answers[selectedAnswers[index]]?.correct, answer: { euuid: question.answers[selectedAnswers[index]]?.euuid, }, }); }); await syncScore(queryVariableList); await changeQuizStatus("FINISHED"); await getQuizzes(); localStorage.removeItem(localStorageKey); navigate(`${import.meta.env.BASE_URL}quiz/${params.euuid}/finish`); setLoading(false);};The handleFinishQuiz function calculates the score for each question based on the selected answer and updates the quiz status to "FINISHED." It then syncs the scores with the backend, refetches the quizzes, removes the quiz state from local storage, and navigates to the quiz finish page.
Sync scores#
The syncScore mutation is defined as follows. It takes a list of scores and returns the unique identifier (euuid) of the synced scores.
const SYNC_SCORES = `mutation syncScore($scores: [ScoreInput!]) {  syncScoreList(score: $scores) {    euuid  }}`;
const syncScore = async (queryVariable) => { try { await client.request(SYNC_SCORES, queryVariable); } catch (error) { throw new Error("Could not save score"); }};Change quiz status#
The changeQuizStatus function updates the quiz status to the specified status, in this case, "FINISHED."
const SYNC_QUIZ = `mutation syncQuiz($quiz: QuizInput!) {  syncQuiz(quiz: $quiz) {    euuid  }}`;
const changeQuizStatus = async (status) => { try { await client.request(SYNC_QUIZ, { quiz: { euuid: params?.euuid, status, }, }); } catch (error) { throw new Error("Could not change quiz status"); }};Get quizzes#
The getQuizzes function refetches the quizzes inside the context of the quiz application.
const getQuizzes = async () => { const { searchQuiz } = await client.request<QuizQueryResponse>(SEARCH_QUIZZES); setQuizzes(searchQuiz);};Finish screen#
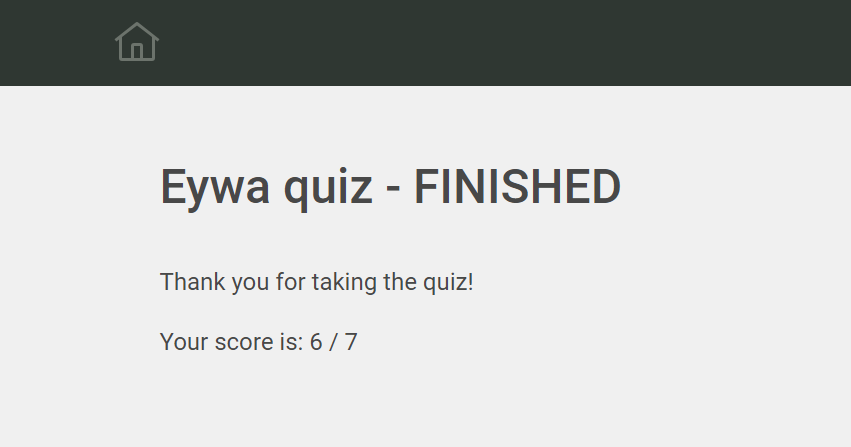
After finishing the quiz, you'll see the results screen, which displays your score.
Get final score#
The getFinalScore function fetches the final score of the user for the quiz.
export const SEARCH_FINAL_SCORE = `query searchFinalScore($userEuuid: UUID!, $quizEuuid: UUID!) { searchScore { euuid iscorrect modified_on score player { euuid(_eq: $userEuuid) name } quiz { euuid(_eq: $quizEuuid) } question { euuid question answers { answer correct euuid modified_on } } }}`;const getFinalScore = async () => { const { searchScore } = await client.request<ScoreQueryResponse>(SEARCH_FINAL_SCORE, { quizEuuid: quiz?.euuid, userEuuid: userData?.euuid, }); setScores(searchScore);};
const sumScore = () => { return scores.reduce((acc, score) => acc + score.score, 0);};
const outOf = () => { return quiz?.questions.reduce((acc, question) => acc + question.points, 0);};
useEffect(() => { getFinalScore();}, [quiz, userData]);Render final score#
return ( <Layout> <div> <h2>{quiz?.name + " - FINISHED"}</h2> <br /> <p>Thank you for taking the quiz!</p> <p> Your score is: {sumScore()} / {outOf()} </p> </div> </Layout>);Recent played quizzes#
The "Recent Played Quizzes" section displays the quizzes that you have recently participated in. It provides a quick overview of your quiz history, allowing you to review your performance and track your progress over time.

Fetch recent quizzes#
Query searchQuiz to get all recent quizzes played by the user, where the status is "FINISHED."
export const SEARCH_RECENT_PLAYED_QUIZZES = `query searchRecentPlayed($userEuuid: UUID!) { searchQuiz { date end_time euuid modified_on name description start_time type status(_eq: FINISHED) questions { duration_sec euuid modified_on points question answers { euuid answer correct } } players { euuid(_eq: $userEuuid) name } } }}`;const [recentPlayedQuizzes, setRecentPlayedQuizzes] = useState<Quiz[]>([]);const { userData } = useUser();
useEffect(() => { const fetchUpcomingQuizzes = async () => { try { const { searchQuiz } = await client.request<QuizQueryResponse>(SEARCH_RECENT_PLAYED_QUIZZES, { userEuuid: userData.euuid, }); setRecentPlayedQuizzes(searchQuiz); } catch (error) { console.error("Error fetching upcoming quizzes:", error); } };
fetchUpcomingQuizzes();}, []);Render recent quizzes#
Render the fetched recent quizzes in the "Recent Played Quizzes" section:
<Row> {recentPlayedQuizzes.map((quiz) => ( <Col md={4} key={quiz.euuid}> <Card className="Card"> <CardBody> <CardTitle>{quiz.name}</CardTitle> <CardText> <small> {quiz.type} | {quiz.players.length} {`${quiz.players.length > 1 ? "Players " : "Player"}`} |{" "} {quiz.questions.length} Questions </small> </CardText> <ShowScores quiz={quiz} /> </CardBody> </Card> </Col> ))}</Row>Show scores#
The ShowScores component displays the scores of the user for the quiz. It shows the score, the total score, and the percentage of correct answers.

Fetch scores#
Query searchScore to get the scores of the quiz that the user has played.
export const SEARCH_SCORES = `query searchScore($quizEuuid: UUID!) { searchScore { euuid iscorrect modified_on score player { euuid name } quiz { euuid(_eq: $quizEuuid) } question { euuid question answers { answer correct euuid modified_on } } }}`;const [scores, setScores] = useState<Score[]>([]);const [showResults, setShowResults] = useState(false);
const showResult = async () => { try { const { searchScore } = await client.request<ScoreQueryResponse>(SEARCH_SCORES, { quizEuuid: quiz.euuid, }); setScores(searchScore); setShowResults(true); } catch (err) { throw new Error(String(err)); }};Render scores#
The renderScores function displays the scores of the user for the quiz. It calculates the total score. In the JSX it maps through the quiz.players and calls the renderScores function for each player.
const renderScores = (player) => {  const playerScore = scores.filter((score) => score.player.euuid === player.euuid);  const score = playerScore.reduce((acc, score) => acc + score.score, 0);  const outOf = () => {    return quiz?.questions.reduce((acc, question) => acc + question.points, 0);  };  return (    <CardText key={player.euuid}>      <small>        <li>          {player.name} - {score} / {outOf()}        </li>      </small>    </CardText>  );};
return (  <>    <Col className="d-flex justify-content-center">      {!showResults ? (        <Button buttonState={ButtonState.PRIMARY_TRANSPARENT} onClick={showResult} label="SHOW SCORES" />      ) : (        <Button          buttonState={ButtonState.PRIMARY_TRANSPARENT}          onClick={() => setShowResults(false)}          label="HIDE SCORES"        />      )}    </Col>
{/* Show scores by user */} {scores.length > 0 && showResults && quiz.players.map((player) => { return renderScores(player); })} </>);Questions#
The "Questions" section allows you to manage and review quiz categories and questions. It provides a comprehensive overview of the quiz content, enabling you to create, edit, and delete categories and questions as needed.
Categories#
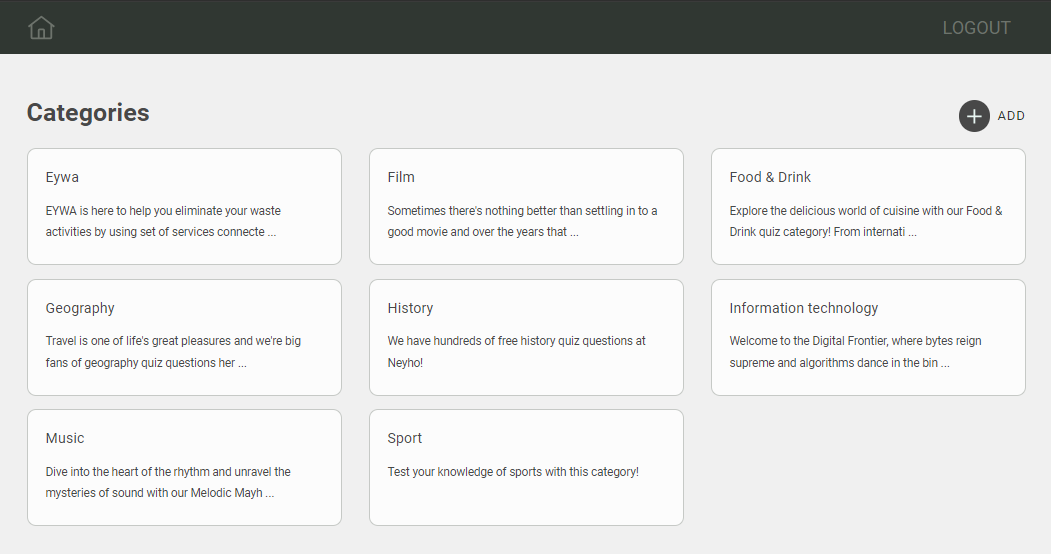
The "Categories" section displays the list of quiz categories, allowing you to view, add, edit, and delete categories. It provides a structured and organized way to manage quiz content, ensuring that all categories are easily accessible and editable.
Fetch & render categories#
const [showAddCard, setShowAddCard] = useState(false);// Categories are fetched from the contextconst { categories } = useCategories();const navigate = useNavigate();
const handleAddCategory = () => {  setShowAddCard(true);};
return ( <Layout> <div className="Header"> <h1 className="Header--title">Categories</h1> <div className="Header--actions"> <Button buttonState={ButtonState.ACTION} onClick={handleAddCategory} label={"Add"}> <span className={"Btn__icon"}> <Add size={32} /> </span> </Button> </div> </div> <div className="quiz-container"> <Row> {showAddCard && <NewCategory setShowAddCard={setShowAddCard} />} {categories?.map((category) => ( <Col md={4} key={category.euuid} className="quiz-card"> <Card className="Card" onClick={() => { navigate(`${import.meta.env.BASE_URL}category/${category.euuid}`, { state: { category }, }); }} > <CardBody> <CardTitle>{category.name}</CardTitle> <CardText id={`card-${category.euuid}`}> <small>{`${category.description?.substring(0, 99)} ${ (category.description?.length ?? 0) > 98 ? "..." : "" }`}</small> </CardText> <UncontrolledTooltip target={`card-${category.euuid}`} placement="bottom"> {category.description} </UncontrolledTooltip> </CardBody> </Card> </Col> ))} </Row> </div> </Layout>);Add category#
The "Add" button triggers the handleAddCategory function, which sets the showAddCard state to true, displaying the "New Category" card.
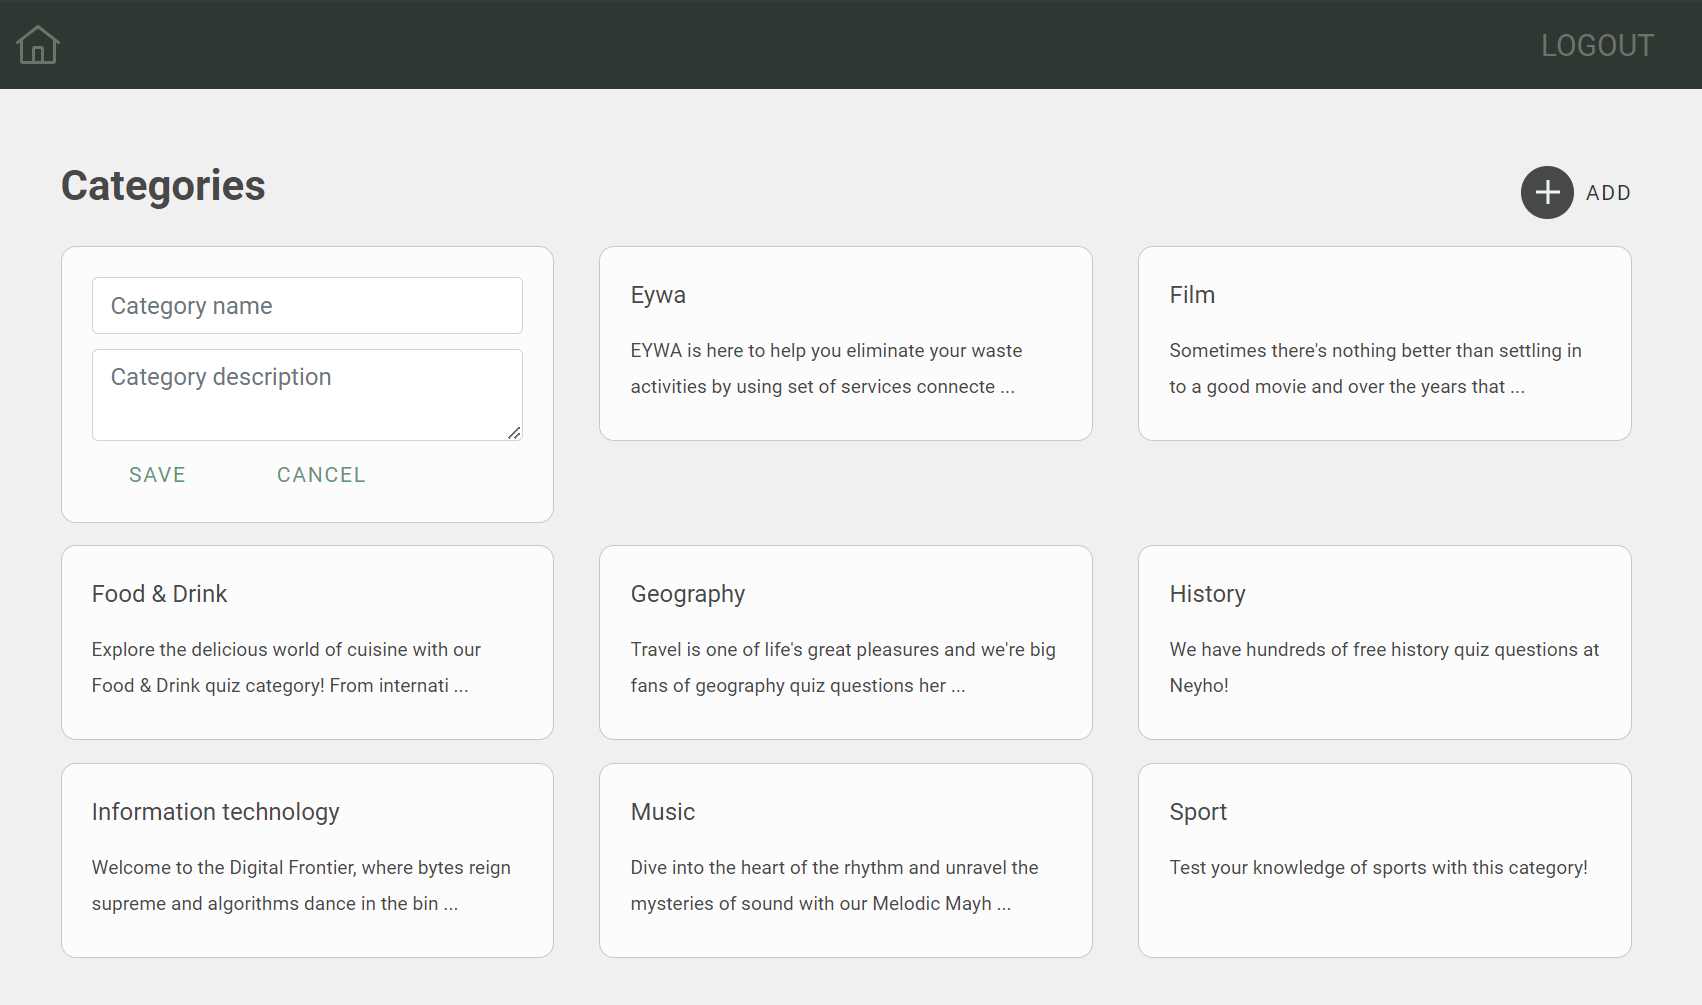
Function handleSaveCategory saves the new category by calling the syncCategory mutation, refetches the categories, clears the inputs, and hides the "New Category" card.
export const SYNC_CATEGORY = `mutation createCategory($category: CategoryInput!) { syncCategory(category: $category) { euuid }}`;const [newCategory, setNewCategory] = useState({ name: "", description: "" });const { getCategories } = useCategories();
const handleSaveCategory = async () => { try { // Save new category const response = await client.request(SYNC_CATEGORY, { category: { ...newCategory }, }); // Refetch categories await getCategories(); // Clear inputs and hide add card setNewCategory({ name: "", description: "" }); setShowAddCard(false); } catch (error) { throw new Error("Could not save category"); }};
const handleInputChange = (e: React.ChangeEvent<HTMLInputElement | HTMLTextAreaElement>) => { const { name, value } = e.target; setNewCategory((prevState) => ({ ...prevState, [name]: value, }));};return ( <Col md={4} className="quiz-card"> <Card className="Card"> <CardBody> <div className="Card__input"> <Input type="text" name="name" value={newCategory.name} onChange={handleInputChange} placeholder="Category name" /> </div> <div className="Card__input"> <Input name="description" type="textarea" value={newCategory.description} onChange={handleInputChange} placeholder="Category description" /> </div> <Button buttonState={ButtonState.PRIMARY_TRANSPARENT} onClick={handleSaveCategory} label={"Save"} /> <Button buttonState={ButtonState.PRIMARY_TRANSPARENT} onClick={() => setShowAddCard(false)} label={"Cancel"} ></Button> </CardBody> </Card> </Col>);Questions#
When you click on a category, you'll see the list of questions in that category. You can view, add, edit, and delete questions in the category.
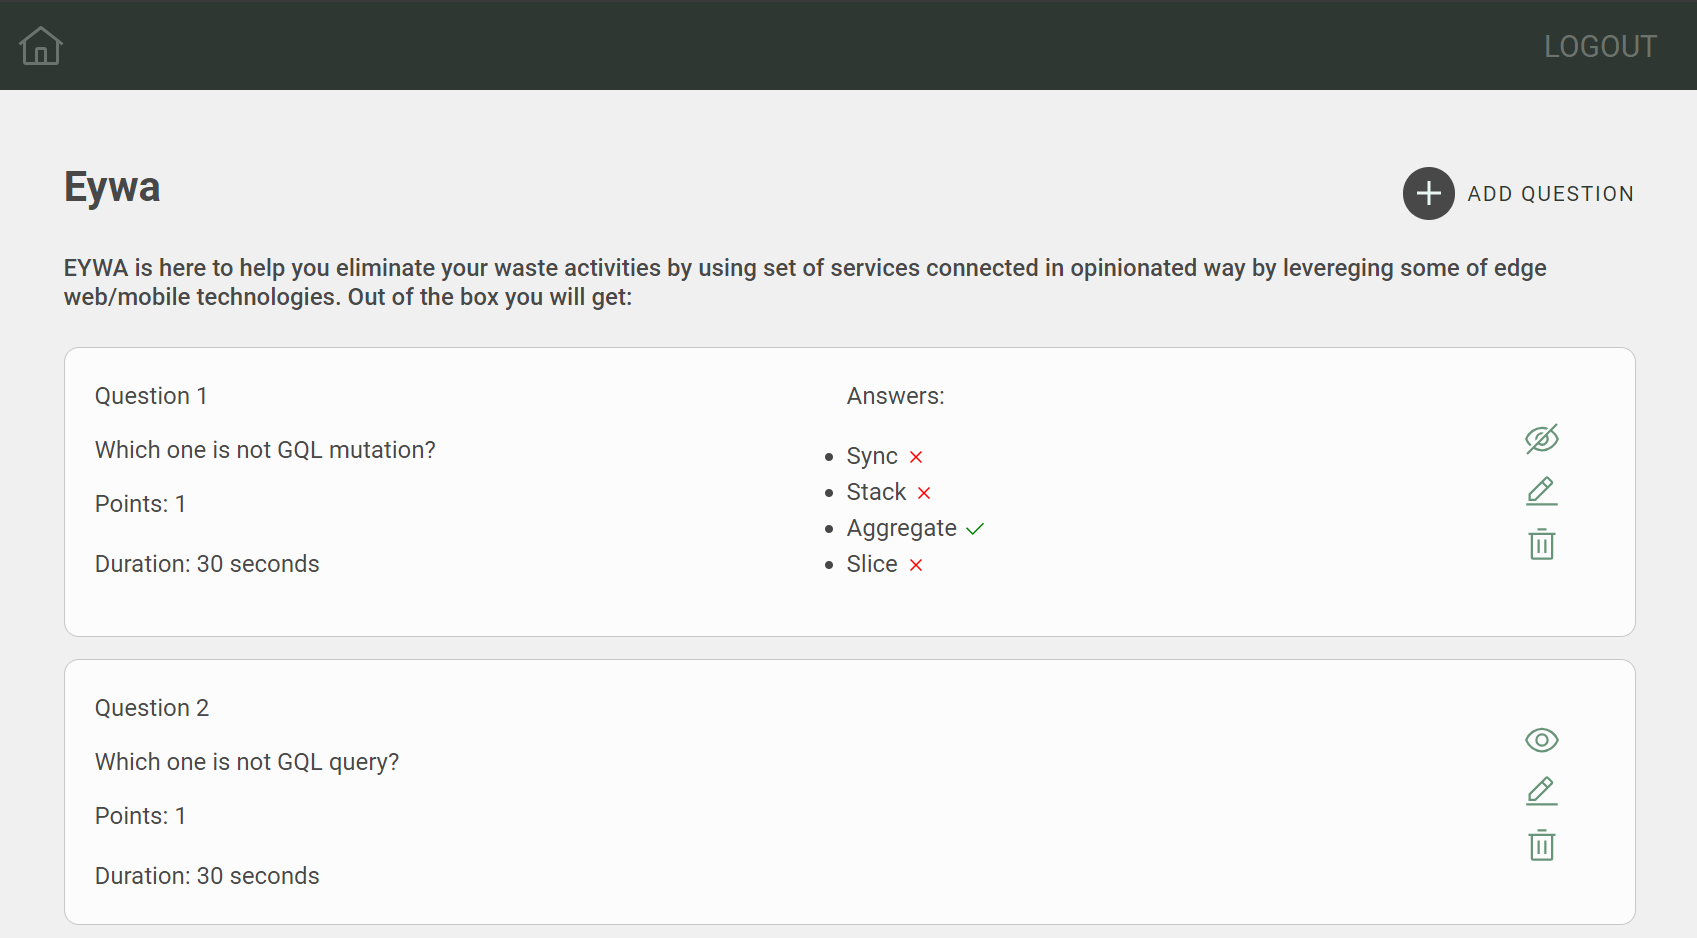
Fetch & render category questions#
export const SEARCH_CATEGORY_QUESTIONS = `query searchQuestion($categoryEuuid: UUID) { searchQuestion { duration_sec euuid modified_on points question answers { answer correct } category { euuid(_eq: $categoryEuuid) name } }}`;const [questions, setQuestions] = useState<Question[]>([]);const location = useLocation();const category = location.state.category as Category;
const getCategoryQuestions = async () => { const { searchQuestion } = await client.request<QuestionQueryResponse>(SEARCH_CATEGORY_QUESTIONS, { categoryEuuid: params.euuid, }); setQuestions(searchQuestion);};
useEffect(() => { getCategoryQuestions();}, [params]);And then questions are rendered in the JSX.
Add/Edit question#
You can add a new question by clicking on the "Add" button, which triggers the handleAddQuestion function. This function sets the showAddCard state to true, displaying the "QuestionForm" card. Also you can edit existing questions by clicking on the question card.
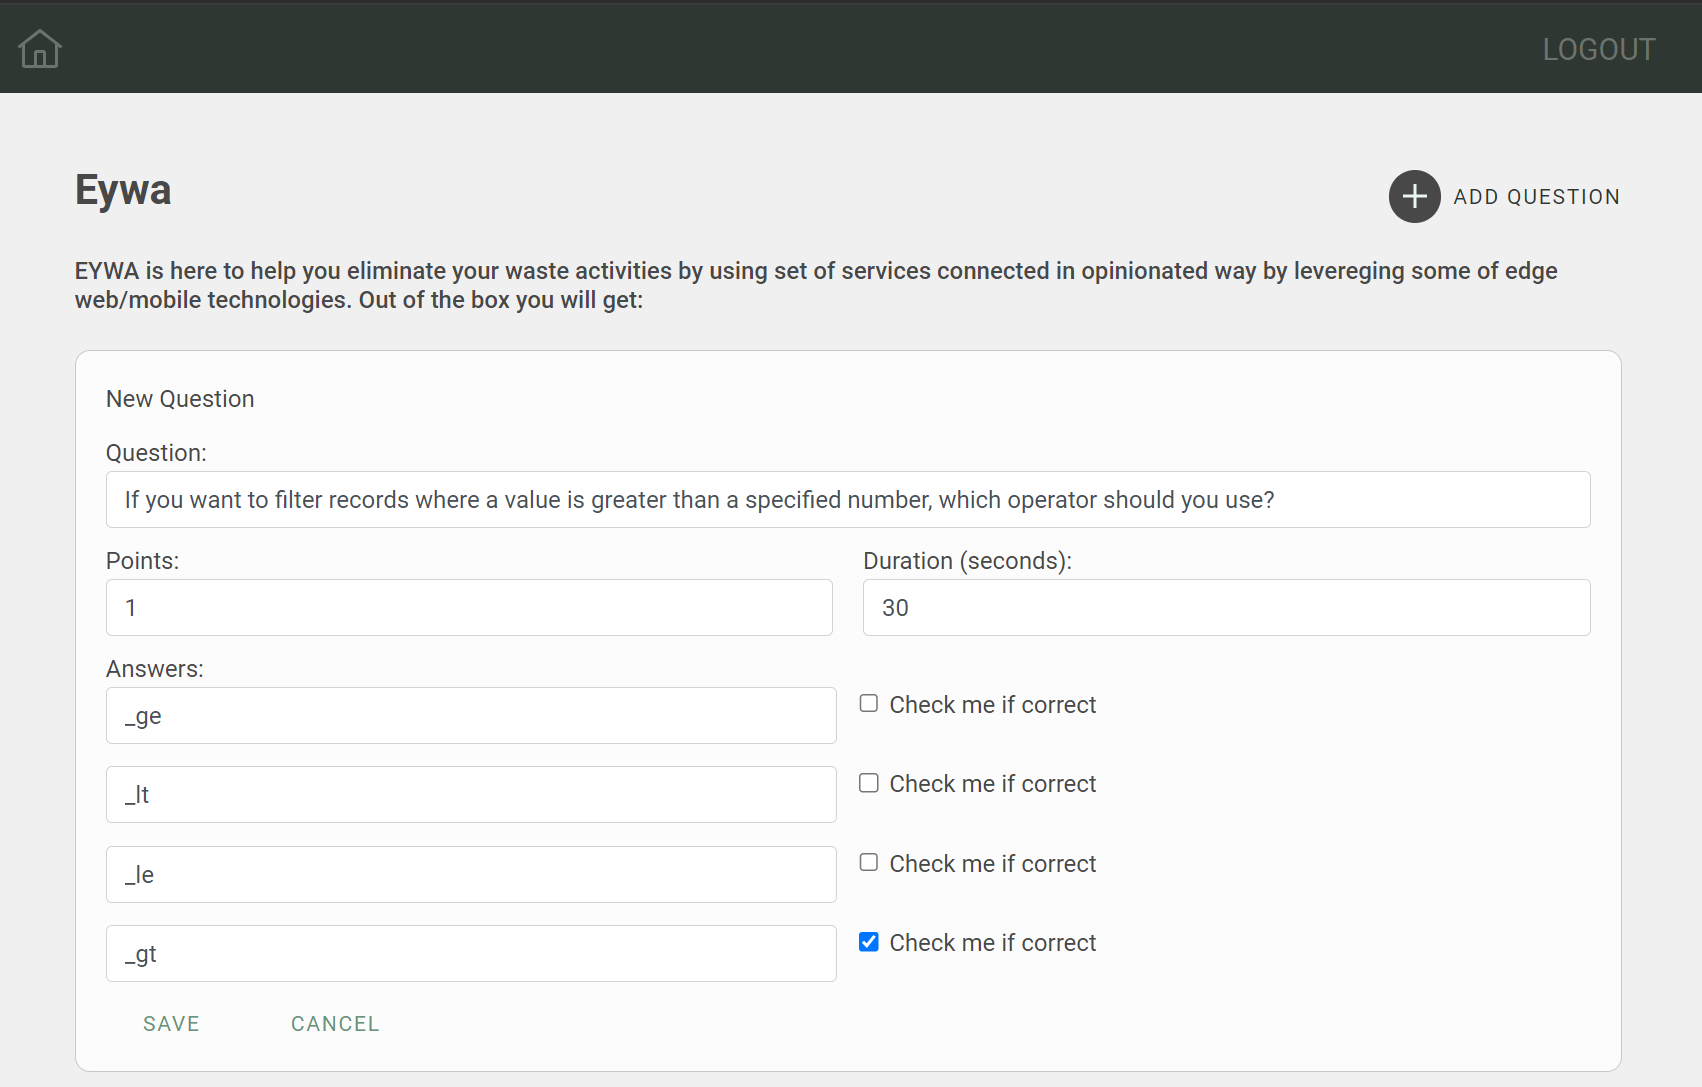
Function handleSaveQuestion saves the new question/edited question by calling the syncQuestion mutation, refetches the questions, clears the inputs, and hides the "QuestionForm" card.
export const SYNC_QUESTION = `mutation syncQuestion($question: QuestionInput!) { syncQuestion(question: $question) { euuid }}`;const [newQuestion, setNewQuestion] = useState({ question: question?.question || "", points: question?.points || 1, duration_sec: question?.duration_sec || 30, answers: question?.answers || ([ { answer: "", correct: false }, { answer: "", correct: false }, { answer: "", correct: false }, { answer: "", correct: false }, ] as Answer[]),});
const handleSaveQuestion = async () => { // Add newQuestion to the category const response = await client.request(SYNC_QUESTION, { question: { euuid: question?.euuid || undefined, question: newQuestion.question, points: newQuestion.points, duration_sec: newQuestion.duration_sec, answers: newQuestion.answers, category: { euuid: category.euuid, }, }, }); await getCategoryQuestions(); await getCategories(); setAddingQuestion && setAddingQuestion(false); setEditingQuestion && setEditingQuestion({ editing: false, question: undefined, }); setShowAnswers([...showAnswers, false]); resetNewQuestion();};Delete question#
You can delete a question by clicking on the "Delete" button, which triggers the handleDeleteQuestion function. This function deletes the question by calling the deleteQuestion mutation, refetches the questions, and hides the "QuestionForm" card.
export const DELETE_QUESTION = `mutation deleteQuestion($euuid: UUID!) {  deleteQuestion(euuid: $euuid) {  }}`;
const handleDeleteQuestion = async (euuid) => { await client.request(DELETE_QUESTION, { euuid, }); await getCategoryQuestions();};Conclusion#
In this guide, we have demonstrated how to build a quiz application using EYWA's GraphQL API. We have covered various use cases, including launching quizzes, answering questions, and managing quiz content. By following this guide, you can create a fully functional quiz application that allows users to participate in quizzes, view their scores, and manage quiz content. You can further customize the application by adding additional features and functionalities to enhance the user experience. We hope this guide has been helpful in building your quiz application using EYWA's GraphQL API. If you have any questions or need further assistance, please feel free to reach out to us. We are here to help you build amazing applications with EYWA. Happy coding! 🚀